Thursday, June 29, 2017

LUKS ENCRYPTION

sudo apt-get install cryptsetup
sudo fallocate -l 64G /root/fordocker
sudo cryptsetup -y luksFormat /root/fordocker
sudo file /root/fordocker
sudo cryptsetup luksOpen /root/test2 volume1
sudo mkfs.ext4 -j /dev/mapper/volume1
sudo mkdir /var/lib/docker
sudo mount /dev/mapper/volume1 /var/lib/docker
df -h


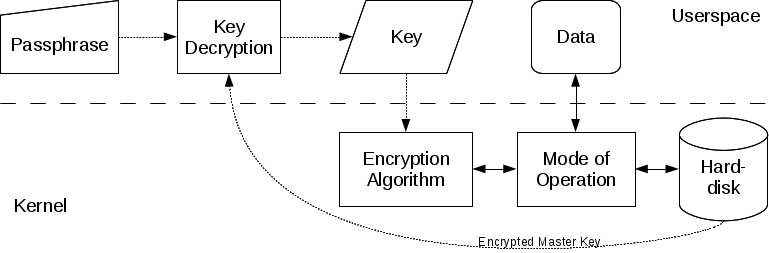
LUKS is a on-disk format for encrypted volumes. It puts metadata in front of the actual encrypted data. The metadata stores the encryption algorithm, key length, block chaining method etc. Therefore one does not need to memorize those parameters which make LUKS suitable for use on e.g. USB memory sticks. Additionally LUKS uses a master key that is encrypted using the passphrase hash. That way it's possible to change the passphrase and one can use multiple passphrases. cryptsetup is able to handle LUKS volumes.

Luks is an encryption layer on a block device, it operates on a particular block device, and exposes a new block device which is the decrypted version. Access to this device will trigger transparent encryption/decryption while it's in use.


LUKs stores a bunch of metadata at the start of the device.

It has slots for multiple passphrases. Each slot has a 256-bit salt that is shown in the clear along with an encrypted message. When entering a passphrase LUKS combines it with each of the salts, in turn, hashing the result and tries to use the result as keys to decrypt an encrypted message in each slot. This message consists of some known text and a copy of the master key. If it works for any one of the slots because of the known text matches, the master key is now known and you can decrypt the entire container. The master key must remain unencrypted in RAM while the container is in use.

Knowing the master key allows you access to all the data in the container, but doesn't reveal the passwords in the password slots so one user cannot see the passwords of other users. The system is not designed for users to be able to see the master key while in operation, and this key can't be changed without re-encrypting. The use of password slots, however, means that passwords can be changed without re-encrypting the entire container, and allows for use of multiple passwords.


Monday, June 19, 2017

Installing Hygieia Dashboard on Ubuntu 16.04


Install Java

sudo apt-add-repository ppa:webupd8team/java
sudo apt-get update
sudo apt-get install oracle-java8-installer

Install mongo db

sudo apt-key adv --keyserver hkp://keyserver.ubuntu.com:80 --recv EA312927
echo "deb http://repo.mongodb.org/apt/ubuntu xenial/mongodb-org/3.2 multiverse" | sudo tee /etc/apt/sources.list.d/mongodb-org-3.2.list
sudo apt-get update
sudo apt-get install -y mongodb-org

Edit following file and add contents

sudo vi /etc/systemd/system/mongodb.service

----------------------------
[Unit]
Description=High-performance, schema-free document-oriented database
After=network.target

[Service]
User=mongodb
ExecStart=/usr/bin/mongod --quiet --config /etc/mongod.conf

[Install]
WantedBy=multi-user.target

----------------------------------

start mongodb

sudo systemctl start mongodb
sudo systemctl status mongodb
sudo systemctl enable mongodb

create db and user in mongo.

use dashboarddb

db.createUser( { user: "dashboarduser", pwd: "dbpassword", roles: [ {role: "readWrite", db: "dashboarddb"} ] } )


Install other required software.

sudo apt-get install nodejs-legacy
sudo apt-get install ruby
ruby -e "$(curl -fsSL https://raw.githubusercontent.com/Homebrew/install/master/install)"
sudo apt-get install npm
sudo npm install -g bower
sudo npm install -g gulp
sudo apt-get install gdebi
wget http://ppa.launchpad.net/natecarlson/maven3/ubuntu/pool/main/m/maven3/maven3_3.2.1-0~ppa1_all.deb
sudo gdebi maven3_3.2.1-0~ppa1_all.deb
sudo ln -s /usr/share/maven3/bin/mvn /usr/bin/mvn
sudo apt-get install git

checkout hygieia code.

mkdir Hygieia
cd Hygieia
git clone https://github.com/capitalone/Hygieia.git .

Build code.

mvn clean install

-------------------------------

cd UI
UI$ gulp serve

UI starts on port 3000

Start API:

Create dashboard.properties in Hygieia/api folder.

Hygieia/api$ vi dashboard.properties

Add following content.

-----------------------------

# dashboard.properties
dbname=dashboarddb
dbusername=dashboarduser
dbpassword=dbpassword

-----------------------------

Now start API.

Hygieia/api$ java -jar target/api.jar --spring.config.location=dashboard.properties -Djasypt.encryptor.password=hygieiasecret

And then you can start the collectors you want.

Friday, December 23, 2016

SFTP on Ubuntu 14.04


SFTP is an interactive file transfer program, similar to ftp, which performs all operations over an encrypted ssh transport.

In FTP all data is passed back and forth between the client and server without the use of encryption. This makes it possible for an evesdropper to listen in and retrieve your confidential information including login details. With SFTP all the data is encrypted before it is sentsent across the network.


Step 1 : Install OpenSSH package if not installed
$sudo apt-get install openssh-server

Step 2 : Create separate group for SFTP users.
sudo addgroup ftpaccess

Step 3 : Edit /etc/ssh/sshd_config file and make changes as below.

$sudo vi /etc/ssh/sshd_config

Find and comment below line. #Subsystem sftp /usr/lib/openssh/sftp-server

and add these lines to the end of the file.

Subsystem sftp internal-sftp
Match group ftpaccess
ChrootDirectory %h
X11Forwarding no
AllowTcpForwarding no
ForceCommand internal-sftp

Step 3.1

Enable password Authentication in same file.

PasswordAuthentication yes

Step 4 : Restart sshd service.
sudo service ssh restart

Step 5 : Add user with ftpaccess group and create password.
$sudo adduser exampleuser --ingroup ftpaccess --shell /usr/sbin/nologin

Step 6 : Modify home directory permission.
$sudo chown root:root /home/exampleuser

Step 7 : Create a directory inside home for upload and modify permission with group.
sudo mkdir /home/exampleuser/www
$sudo chown exampleuser:ftpaccess /home/exampleuser/www

Step 8 : Test if sftp works.
$sftp exampleuser@<ip address>
exampleuser@<ip address>'s password: [Enter password here created above for this user]
Connected to <ip address>.

Step 9 : Use a FTP Client to connect to the server now.


Tuesday, December 20, 2016

Vagrant for Automating Your Virtual Box

Vagrant creates and configures virtual development environments. It can be seen as a higher-level wrapper around virtualization software such as VirtualBox, VMware, KVM and Linux Containers (LXC), and around configuration management software such as Ansible, Chef, Salt and Puppet.

Vagrant is not just about creating VMs, it is about automating the work of setting up development environments for our projects. Also, we can check Vagrantfiles into source control with each project, so the environment is essentially stored with the code, without having to find a way to store a VM itself.


Install VirtualBox
sudo apt-get install virtualbox

Install Vagrant
sudo apt-get install vagrant

OR Install Vagrant from here
https://www.vagrantup.com/downloads.html

mkdir vagrant_test
cd vagrant_test
vagrant init

This will create a Vagrantfile. As said Vagrantfile is config file for the virtual machine.

Next download an image.
vagrant box add ubuntu/trusty64
you can browse for available boxes here : https://atlas.hashicorp.com/boxes/search

This stores the box under a specific name so that multiple Vagrant environments can re-use it. Just like VM templates

[Note : The syntax for the vagrant box add subcommand is changed with the version 1.5, due to the Vagrant Cloud introduction.
vagrant box add {title} {url}
http://www.vagrantbox.es/]

Next change your Vagrantfile contens as below.

Vagrant.configure("2") do |config|
   config.vm.box = "ubuntu/trusty64"
   config.vm.network "private_network", ip: "xxx.xxx.xx.xx"
   config.vm.provider "virtualbox" do |vb|
     vb.cpus = 2
     vb.memory = "4096"
   end
end
Instead of using default box , we point config.vm.box to "ubuntu/trusty64" that we downloaded earlier.
config.vm.network : This allows to access any servers running on the box to be available to the network. You can configure public ip if you need.
Next , we set number of cpus 2 , also memory to 4GB.

Now bring up the box using following command
vagrant up

We can connect to the machine using
vagrant ssh

To destroy VM, we can use following command
vagrant destroy

Also note that vagrant halt will shut down the machine gracefully. And if you make any changes to Vagrantfile, to update the box we can use vagrant reload command.


Thursday, December 15, 2016

Create Dynamo DB Table using Cloud Formation Template


AWS CloudFormation simplifies provisioning and management on AWS. It gives developers and systems administrators an easy way to create and manage a collection of related AWS resources, provisioning and updating them in an orderly and predictable fashion. To provision and configure stack resources, we must understand AWS CloudFormation templates, which are formatted text files in JSON or YAML. These templates describe the resources that we want to provision in your AWS CloudFormation stacks. We can use the AWS CloudFormation Designer or any text editor to create and save templates.

Let us how designer works in an another blog entry. For now you can play with designer if you wish.
https://console.aws.amazon.com/cloudformation/designer

Creating Dynamo DB Using AWS Cloud Formation Template.

1. We need to create a custom IAM policy "createstack". This policy hels us to execute aws createstack command.

{
    "Version": "2012-10-17",
    "Statement": [
        {
            "Sid": "Stmt1449904348000",
            "Effect": "Allow",
            "Action": [
                "cloudformation:CreateStack"
            ],
            "Resource": [
                "*"
            ]
        }
    ]
}

>

2. Attach the above created policy to user through whom we need to create dynamo db table.

3.install awscli and configure
  a. sudo apt-get install awscli
  b. aws configure
        now give proper details like access key and region. This will create a config file in ~/.aws directory.
  c. test if configured properly using command 'aws s3 ls'. This should list all the s3 buckets if you have any.

4.Create a Cloud formation temlate like below , for creating dynamo db.


{
  "AWSTemplateFormatVersion" : "2010-09-09",
  "Resources" : {
    "myDynamoDBTable" : {
      "Type" : "AWS::DynamoDB::Table",
      "Properties" : {
        "AttributeDefinitions" : [
          {
            "AttributeName" : "Name",
            "AttributeType" : "S"   
          },
          {
            "AttributeName" : "Age",
            "AttributeType" : "S"
          }
        ],
        "KeySchema" : [
          {
            "AttributeName" : "Name",
            "KeyType" : "HASH"
          },
          {
            "AttributeName" : "Age",
            "KeyType" : "RANGE"
          }
        ],
        "ProvisionedThroughput" : {
          "ReadCapacityUnits" : "5",
          "WriteCapacityUnits" : "5"
        },
        "TableName" : "Person"
      }
    }
  }
}


5. Save the above file in a s3 bucket and copy the URL of this file.

6. Now on your command line , you can enter following command to create dynamodb table.

aws cloudformation create-stack --stack-name <stack_name> --template-url <s3_bucket_template_url>

----------------------------------------------------------------------------------------------------------------------------

Now, this is too much of manual process. This can be done using a python code as well. ( or java , node.js etc, lets see python for now ).

Here is how.

1. Create a config file like below. Save it as 'awsconfig'

[default]
aws_access_key_id = xxxxxxxx
aws_secret_access_key = xxxxxxxxxxxxxxxxxxx
region = us-west-2

2. Create a shell script like below.

sudo apt-get install -fy --force-yes awscli python
sudo curl -s 'https://bootstrap.pypa.io/get-pip.py' | python2.7 && pip install boto awscli
sudo mkdir ~/.aws
cp awsconfig ~/.aws/config

The above script should install all the required tools for python to create a dynamo db. Allow execution permission and execute the script.

3. Create a python file using following code.


from __future__ import print_function # Python 2/3 compatibility
import boto3

dynamodb = boto3.resource('dynamodb', region_name='us-west-2')


table = dynamodb.create_table(
    TableName='Person',
    KeySchema=[
        {
            'AttributeName': 'name',
            'KeyType': 'HASH'  #Partition key
        },
        {
            'AttributeName': 'age',
            'KeyType': 'RANGE'  #Sort key
        }
    ],
    AttributeDefinitions=[
        {
            'AttributeName': 'name',
            'AttributeType': 'S'
        },
        {
            'AttributeName': 'age',
            'AttributeType': 'N'
        },

    ],
    ProvisionedThroughput={
        'ReadCapacityUnits': 5,
        'WriteCapacityUnits': 5
    }
)

print("Table status:", table.table_status)


4. Execute python code .

  python create_dynamo_table.py

5. Check your Dynamo DB service , table called person should have been created.


Sunday, December 11, 2016

AWS RDS - Take Snapshot, Delete Instance and Restore Instance using Snapshot - Scheduled Automation using Lambda

Create a test RDS instance which is db.t2.micro ( free tier ) , name it testdb and provide all parameters and create.

1. Create an IAM Role for Lambda with following policy. IAM → Roles → CreateNewRole

{
    "Version": "2012-10-17",
    "Statement": [
        {
            "Effect": "Allow",
            "Action": [
                "logs:CreateLogGroup",
                "logs:CreateLogStream",
                "logs:PutLogEvents"
            ],
            "Resource": "arn:aws:logs:*:*:*"
        },
        {
            "Action": [
                "rds:AddTagsToResource",
                "rds:CopyDBSnapshot",
                "rds:CopyDBClusterSnapshot",
                "rds:DeleteDBInstance",
                "rds:DeleteDBSnapshot",
                "rds:RestoreDBInstanceFromDBSnapshot",
                "rds:Describe*",
                "rds:ListTagsForResource"
            ],
            "Effect": "Allow",
            "Resource": "*"
        }
    ]
}

2. Create a Lambda function for deleting RDS instance by taking latest snapshot.


3. Select Blank Function.


4. Configure Trigger Using CloudWatch Events – Schedule.


5. Enter Rule Name , Rule Description and Scheduled Expression ( in UTC ) time like : cron(0 0 21 ? * MON-FRI *) - This means it triggers every day from mon to friday at night 9 pm UTC time


6. Select python 2.7 and write Lambda Function ( change db_instance and region accordingly )

import boto3  
import datetime  
import time  
import sys

db_instance='testdb'  
region='us-west-2'

def lambda_handler(event, context):  
    try: 
        date=time.strftime("-%d-%m-%Y")
        snapshot_name = db_instance+date
        source = boto3.client('rds', region_name=region)
        global db_instance
        source.delete_db_instance(DBInstanceIdentifier=db_instance,SkipFinalSnapshot=False,FinalDBSnapshotIdentifier=snapshot_name)
    except Exception as e:
        raise e
    print '[main] End'


7. Select existing IAM role that we created in Step 1.
8. Create Lambda.
9. Test this Function and wait till snapshot created and instance deleted.


Restore :

1 . Create Lambda trigger at morning 9 am UTC


2. Add lambda code.


3.Write Lambda Function

import boto3  
import botocore  
import datetime  
import re  
import logging

region='us-west-2'  
db_instance_class='db.t2.micro'  
db_subnet='default'  
instances = ['testdb']

print('Loading function')

def byTimestamp(snap):  
  if 'SnapshotCreateTime' in snap:
    return datetime.datetime.isoformat(snap['SnapshotCreateTime'])
  else:
    return datetime.datetime.isoformat(datetime.datetime.now())

def lambda_handler(event, context):  
    source = boto3.client('rds', region_name=region)
    for instance in instances:
        try:
            source_snaps = source.describe_db_snapshots(DBInstanceIdentifier = instance)['DBSnapshots']
            print "DB_Snapshots:", source_snaps
            source_snap = sorted(source_snaps, key=byTimestamp, reverse=True)[0]['DBSnapshotIdentifier']
            snap_id = (re.sub( '-\d\d-\d\d-\d\d\d\d ?', '', source_snap))
            print('Will restore %s to %s' % (source_snap, snap_id))
            response = source.restore_db_instance_from_db_snapshot(DBInstanceIdentifier=snap_id,DBSnapshotIdentifier=source_snap,DBInstanceClass=db_instance_class, DBSubnetGroupName=db_subnet,MultiAZ=False,PubliclyAccessible=True)
            print(response)

        except botocore.exceptions.ClientError as e:
            raise Exception("Could not restore: %s" % e)


3. Select IAM Role.
4. Create Function
5. Test Function.


Saturday, November 26, 2016

How to profile JVM running on a remote server docker container.

On a Ubuntu desktop install JProfiler GUI from here.

Download script and run it.
http://download-keycdn.ej-technologies.com/jprofiler/jprofiler_linux_9_2.sh

Provide key if you have , else use evaluation.

Now on the Ubuntu server where docker container is running, you need to stop containers first and modify Dockerfile to add jprofiler

wget http://download-keycdn.ej-technologies.com/jprofiler/jprofiler_linux_9_2.tar.gz && \
tar -xzf jprofiler_linux_9_1_1.tar.gz -C /usr/local

Also expose the port 8849 from container to host so that you can connect from your desktop.

If you use docker-compose.yml, map the port in the service , which you want to connect.
For example

version: "2"
services:
  some_service:
    build: .
    ports:
      - "8849:8849"
    depends_on:
      - "db"
    entrypoint:


This will download jprofiler 9.2 and unpack it in /usr/local when you run docker container next time and map the port on host server.

Once docker container is up , you can ssh to it
docker exec -it /bin/bash
And just start the jprofiler using following command.
/usr/local/jprofiler9/bin/jpenable
You will be asked for 2 options , 1) GUI connect 2. Using config.xml

Use option 1 GUI connect
Now from Desktop you can open JProfiler UI and connect to server-ip:8849
You can profile the JVM you want.